A finished build can still look like a work zone. We have walked onto plenty of newly completed Dublin sites where the work was done, the tools were gone, and yet a fine grey film covered every surface. That is the nature of construction dust. It settles, gets disturbed when someone walks through, and settles […]
How Do I Clean My Oven? Expert Tips for Sparkling Results
Cleaning an oven can seem daunting. But it's easier than you think.
With the right steps, you can make your oven sparkle. Ovens are essential for cooking, but they can get dirty fast. Grease and food spills build up over time. This can affect how well your oven works. A clean oven not only looks nice but also cooks food better.
It’s important for both safety and taste. In this guide, you'll find simple and effective ways to clean your oven. Whether it’s a light touch-up or a deep clean, you’ll learn tips that fit your needs. Discover how to keep your oven in top shape with ease. Let's dive into the steps for a cleaner oven today!
Essential Tools
Cleaning your oven doesn't need to be a daunting task. With the right tools, you can make the process smooth and efficient. Having essential tools at hand ensures you tackle stubborn grime and baked-on residues effectively. Knowing what to use is crucial for keeping your oven sparkling clean. Let's dive into the essential tools you'll need to clean your oven like a pro.
Cleaning Supplies
To clean your oven effectively, you need the right supplies. Here are some must-have items:
- Baking Soda and Vinegar: These are natural cleaning agents. When combined, they break down tough stains.
- Dish Soap: A few drops can help dissolve grease.
- Commercial Oven Cleaner: These are specially formulated to tackle oven grime. Check the label for safe usage.
- Scouring Pads or Brushes: These help scrub off stubborn dirt.
- Microfiber Cloths: Ideal for wiping surfaces clean without scratching.
Here's a simple table to compare some cleaning supplies:
| Supply | Benefits |
| Baking Soda | Natural, non-toxic, effective for stains |
| Vinegar | Disinfects, cuts through grease |
| Dish Soap | Breaks down grease |
Each tool plays a unique role in making your oven spotless. Choose wisely based on your cleaning needs.
Protective Gear
Safety is vital during oven cleaning. Protect yourself with the right gear:
- Gloves: Wear rubber gloves to protect your hands from harsh chemicals and hot surfaces.
- Eye Protection: Goggles prevent splashes from reaching your eyes.
- Face Mask: Use a mask to avoid inhaling strong fumes. Essential when using commercial cleaners.
- Apron: Keeps your clothes clean from spills and splashes.
Here's a checklist for protective gear:
- Wear gloves to handle cleaners safely.
- Use goggles for eye protection.
- Put on a mask if fumes are strong.
- Wear an apron to keep clothes clean.
These items are crucial for a safe cleaning experience. Don't skip on protective gear. It ensures your safety while cleaning the oven.
Preparation Steps
Cleaning your oven can seem like a daunting task, but with the right preparation, it becomes much easier. Proper preparation ensures that the cleaning process is efficient and thorough. By following these simple steps, you can ensure your oven is ready for a deep clean. Let's explore the essential preparation steps to make this task less overwhelming.
Empty The Oven
Before you start cleaning, it's important to empty your oven completely. Removing all contents ensures that you can access every corner and surface. Here's how to do it efficiently:
- Take Out All Items: Remove any pots, pans, and baking trays. Ensure there's nothing left inside.
- Clear Away Loose Debris: Use a soft brush or cloth to sweep out any crumbs or loose food particles.
- Check the Oven Door: Make sure nothing is stored in the door pocket if your oven has one.
Once the oven is empty, it's easier to spot stains and areas that need special attention. This step is crucial for a thorough cleaning process. The oven's interior should be free of obstacles so that every surface can be cleaned effectively.
| Task | Description |
| Remove Items | Take out all removable objects inside the oven. |
| Clear Debris | Brush away loose crumbs and particles. |
Remove Racks
Next, focus on the oven racks. Removing the racks is essential for cleaning both the racks themselves and the oven's interior. Follow these simple steps:
- Gently Slide Out Racks: Pull the racks out slowly to avoid scratching the oven walls.
- Inspect for Grease: Check each rack for grease or stubborn stains that need special attention.
- Soak in Hot Soapy Water: Fill a large basin or sink with hot water and dish soap. Let the racks soak to loosen grime.
- Scrub and Rinse: Use a soft sponge or brush to scrub the racks. Rinse thoroughly with clean water.
With the racks removed, you'll have better access to the oven's interior. This makes cleaning the interior surfaces more efficient. Taking the time to properly clean the racks will also improve the overall hygiene of your oven.
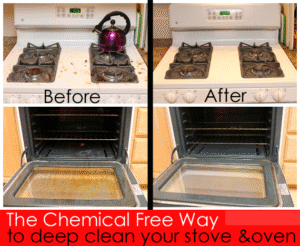
Natural Cleaning Solutions
Cleaning your oven doesn't have to involve harsh chemicals or expensive products. Natural cleaning solutions are not only eco-friendly but also effective. You can achieve a sparkling clean oven with ingredients you likely already have at home. Let's explore some simple methods to keep your oven pristine using natural cleaning solutions.
Baking Soda Method
Baking soda is a powerful cleaning agent that tackles grime and grease effortlessly. This method is simple and safe for your oven.
Here's how you can do it:
- Remove oven racks and set them aside.
- Mix 1/2 cup of baking soda with a few tablespoons of water to create a paste.
- Spread the paste evenly inside the oven, avoiding heating elements.
- Leave it overnight for the best results.
- The next day, use a damp cloth to wipe away the paste.
- For stubborn spots, use a spatula or scraper.
The table below summarizes the steps:
| Step | Action |
| 1 | Remove oven racks |
| 2 | Mix baking soda and water |
| 3 | Spread paste inside the oven |
| 4 | Let it sit overnight |
| 5 | Wipe with a damp cloth |
| 6 | Scrape stubborn spots |
This method is gentle on your oven and the environment. Plus, it's cost-effective and easy to do.
Vinegar Spray
Vinegar is another natural cleaning powerhouse. It cuts through grease and leaves your oven smelling fresh.
Follow these steps for an effective clean:
- Mix equal parts of water and white vinegar in a spray bottle.
- Spray the solution inside the oven, focusing on greasy areas.
- Let it sit for 30 minutes to loosen grime.
- Use a clean cloth to wipe the surfaces.
- For tougher spots, repeat the process.
Vinegar is not only effective but also a natural deodorizer. This method ensures your oven is both clean and fresh-smelling.
The vinegar spray method is perfect for quick clean-ups. It’s especially useful for maintaining your oven between deep cleans.
Both the baking soda and vinegar methods are excellent ways to keep your oven clean naturally. They are safe, effective, and use ingredients you already have at home.
Chemical Cleaners
Cleaning your oven can be a daunting task, but using chemical cleaners can make it easier. These cleaners are designed to break down tough grease and grime, making them effective for deep cleaning. Chemical cleaners can save you time and effort, but choosing the right product and applying it correctly is crucial for success and safety. Let's explore how to choose the best chemical cleaner and how to use it effectively.
Choosing The Right Product
Choosing the right chemical cleaner for your oven is essential. Not all cleaners are created equal, and selecting the wrong one can damage your appliance or leave harmful residues.
- Identify your oven type: Some ovens, like self-cleaning models, have specific requirements.
- Check ingredients: Look for cleaners that avoid harsh chemicals. A safer product is better for your health and the environment.
- Read reviews: Customer reviews can provide insight into how well a product works.
Here's a simple table comparing popular oven cleaners:
| Product | Strength | Eco-Friendly |
| Oven Cleaner A | Strong | No |
| Oven Cleaner B | Moderate | Yes |
| Oven Cleaner C | Mild | Yes |
Consider your cleaning needs. A strong cleaner might be needed for heavy grime, while a mild option could suffice for regular maintenance.
Application Tips
Applying the cleaner correctly ensures your oven gets clean and stays safe. Follow these tips for effective application:
- Read instructions carefully: Always start by reading the product's instructions. Follow them closely.
- Prepare your oven: Remove racks and any loose debris. This allows the cleaner to work efficiently.
- Ventilation: Ensure your kitchen is well-ventilated. Open windows or use exhaust fans to minimize inhaling fumes.
- Wear gloves: Protect your skin by wearing gloves. Some cleaners can irritate your skin.
- Apply evenly: Use a brush or cloth to spread the cleaner evenly. Cover all surfaces inside the oven.
- Wait patiently: Allow the cleaner to sit for the recommended time. This helps break down the grime.
- Rinse thoroughly: Once done, rinse with a damp cloth. Ensure all cleaner residue is removed.
Safety is key. Never mix cleaners or use them on surfaces they aren't designed for. With the right approach, your oven will be spotless and ready for your next cooking adventure.
Cleaning The Oven Door
Cleaning the oven door is an essential step in maintaining a functional and aesthetically pleasing kitchen appliance. The oven door often gets overlooked during cleaning routines. Yet, it plays a crucial role in your cooking experience. Over time, grease and grime build up on the glass, obstructing your view of culinary masterpieces. Keeping this surface clean not only improves visibility but also enhances the overall hygiene of your kitchen.
Glass Cleaning Techniques
Cleaning the glass on your oven door can be straightforward with the right approach. Start by gathering necessary supplies: a soft cloth, a mild detergent, and a glass scraper. Avoid using abrasive materials that might scratch the surface. Begin by applying the detergent on the glass, using the cloth to spread it evenly. Let it sit for a few minutes to loosen stubborn stains. Then, gently scrub the glass using circular motions. If residue persists, a glass scraper can help remove it without damaging the surface.
For those preferring natural solutions, a mixture of vinegar and baking soda can be effective. Here's a simple method:
- Mix equal parts of vinegar and water in a spray bottle.
- Spray generously over the glass surface.
- Let it sit for 10 minutes, allowing the vinegar to cut through grease.
- Wipe clean with a damp cloth.
If the glass is double-paned, check the manufacturer's instructions for cleaning between the layers. A clean oven door not only looks appealing but also ensures the appliance functions efficiently.
Seal And Gasket Care
Maintaining the seal and gasket of your oven door is vital for its efficiency. These components ensure heat retention and prevent energy wastage. Begin by inspecting the seal for any visible damage. Cracks or tears can compromise the oven's performance. Use a damp cloth to wipe down the seal, removing any food particles that might have accumulated.
Here are some tips for effective care:
- Check for signs of wear and tear regularly.
- Ensure the gasket is always clean to maintain a tight seal.
- Replace the gasket if it shows significant damage.
For thorough cleaning, you can use a mixture of mild soap and water. Gently rub the gasket surface with a soft brush to remove stubborn grime. Rinse with clean water and dry with a soft cloth. A well-maintained gasket ensures your oven operates efficiently, saving energy and improving cooking results.
By following these simple care tips, you can extend the lifespan of your oven door components, enhancing both its appearance and functionality.
Self-cleaning Feature
Cleaning your oven can be a daunting task. Grease and food spills can build up over time, making the job seem overwhelming. Luckily, many modern ovens come with a self-cleaning feature. This feature makes the cleaning process easier and less time-consuming. It's a convenient way to maintain a fresh and hygienic oven without harsh chemicals.
Using The Self-clean Option
The self-clean option is an efficient feature in many modern ovens. It heats the oven to very high temperatures, burning off food residues and turning them into ash. This ash can then be easily wiped away with a damp cloth. Here’s how you can make the most of this feature:
- Remove Oven Racks: Take out the racks to prevent discoloration or damage.
- Clear Loose Debris: Wipe out loose food particles to reduce smoke during the cycle.
- Set the Cycle: Follow your oven's instructions to set the self-clean cycle, usually lasting 2-4 hours.
- Ventilate Your Kitchen: Open windows or turn on an exhaust fan to manage any smoke or odors.
- Wait for Cooling: Allow the oven to cool before wiping away the ash with a damp cloth.
Here's a brief overview of the self-cleaning process:
| Step | Action |
| Preparation | Remove racks and wipe loose debris |
| Cycle | Set and run the self-clean cycle |
| Cooling | Wait for the oven to cool down |
| Cleaning | Wipe away ash with a damp cloth |
Safety Precautions
While the self-cleaning feature is convenient, it’s essential to follow safety precautions. The high temperatures can pose risks if not handled properly. Here are some key tips:
- Stay Nearby: Avoid leaving the house while the oven is in self-clean mode. This lets you respond quickly if needed.
- Keep Pets and Kids Away: Ensure children and pets are not near the kitchen during the cycle due to high heat and potential fumes.
- Check for Flammable Items: Ensure no flammable items are in or near the oven.
- Read the Manual: Refer to your oven's user manual for specific safety instructions related to your model.
Be aware that the self-cleaning cycle can produce smoke and odors. This is normal, but proper ventilation is crucial. Here’s a quick checklist for safety:
| Safety Tip | Action |
| Supervision | Stay at home and monitor the cycle |
| Ventilation | Open windows or use exhaust fans |
| Manual | Read and understand your oven's manual |
By following these safety precautions, you can ensure a smooth and safe self-cleaning process for your oven.
After-cleaning Care
Cleaning your oven can be a daunting task, but the results are rewarding. A clean oven ensures your meals are delicious and free from unwanted flavors. Once the cleaning process is complete, proper after-care is crucial to maintain its pristine condition. This section will guide you through reinstalling racks and wiping down surfaces, ensuring your oven stays clean and functional.
Reinstalling Racks
After cleaning, it's time to put the racks back in place. Properly reinstalling racks can prevent damage and ensure even cooking.
Start by making sure the racks are dry. Moisture can lead to rust or stains. Use a soft towel to dry them completely. Once dry, follow these steps:
- Identify the correct position: Check your oven's manual for guidance on rack placement.
- Align carefully: Position the racks evenly. Misalignment can affect cooking results.
- Slide smoothly: Gently slide racks into place. Forceful installation can damage the oven's interior.
Consider using a table to track rack positions:
| Rack Position | Use |
| Top Rack | Broiling |
| Middle Rack | Baking |
| Bottom Rack | Roasting |
Proper rack installation enhances cooking efficiency. It also prolongs the life of your oven.
Wipe Down Surfaces
Once the racks are in place, focus on wiping down the surfaces. This ensures your oven stays clean and hygienic.
Start by using a damp cloth to wipe the interior walls. Avoid harsh scrubbers which can scratch surfaces. For stubborn stains, a mixture of baking soda and water can be effective. Here's a simple recipe:
- Mix 2 tablespoons of baking soda with 1 cup of water.
- Apply the mixture to stains.
- Let it sit for 15 minutes.
- Wipe with a damp cloth.
After cleaning the interior, move to the oven door. Use a glass cleaner for the glass surface. Ensure no residue is left behind, as it can affect viewing.
Finally, check the exterior knobs and buttons. These areas can collect grime. A gentle wipe can keep them looking new.
Regular surface maintenance ensures your oven remains spotless and ready for use.
Preventive Measures
Cleaning an oven can seem like a daunting task. But with the right preventive measures, it becomes much easier. Preventive measures not only save time but also ensure your oven stays in top condition. Regular maintenance and spill management play key roles in keeping your oven clean and efficient.
Regular Maintenance Tips
Regular maintenance is crucial for a clean oven. It helps avoid the buildup of stubborn grime and grease. Here are some easy tips to keep your oven in shape:
- Wipe down the oven surfaces weekly. Use a damp cloth to remove light stains and crumbs.
- Inspect the oven seals once a month. Damaged seals can lead to heat loss and inefficient cooking.
- Run the self-cleaning cycle quarterly. This burns away food residues and makes cleaning easier.
- Clean the racks separately. Soak them in warm, soapy water to remove grease.
Following these steps ensures your oven runs smoothly and remains hygienic.
| Task | Frequency |
| Wipe surfaces | Weekly |
| Inspect seals | Monthly |
| Self-clean cycle | Quarterly |
| Clean racks | As needed |
Spill Management
Managing spills promptly prevents stubborn stains. It also reduces foul odors. Here are some strategies for effective spill management:
- Address spills immediately. Use a damp cloth to wipe them before they dry.
- Use a baking sheet. Place it under dishes that might bubble over.
- Avoid aluminum foil. Foil can reflect heat and damage the oven's interior.
- Place a silicone mat on the oven floor. It catches spills and is easy to clean.
These methods help keep your oven clean and odor-free. They also prevent potential damage from burnt food residues.
Troubleshooting Stains
Cleaning your oven can be a daunting task, especially when stubborn stains refuse to budge. These stains not only make your oven look unappealing but can also affect its performance. By understanding how to troubleshoot these stains, you can ensure your oven stays in top condition. This guide will help you tackle common issues like persistent odors and baked-on residue, making your cleaning process more effective and less stressful.
Persistent Odors
Persistent odors in the oven can be quite frustrating. These smells often linger after cooking and can even affect the taste of your food. To tackle these odors effectively, a few simple steps can make a big difference.
First, identify the source of the odor. It could be due to food spills, grease, or even burnt-on residue. Once identified, follow these steps:
- Vinegar and Baking Soda: Create a paste using vinegar and baking soda. Apply this paste to the interior of the oven, focusing on the areas with visible stains. Let it sit for 30 minutes before wiping it off with a damp cloth.
- Lemon and Water Solution: Fill an oven-safe bowl with water and add slices of lemon. Place it in the oven and heat at 250°F for 30 minutes. The steam will help neutralize odors.
- Charcoal: Place a bowl of activated charcoal in the oven overnight. Charcoal absorbs odors effectively.
For more persistent smells, consider using commercial oven cleaners. Always read the instructions carefully to avoid any damage.
Baked-on Residue
Baked-on residue is another common problem that can make your oven look messy and affect cooking performance. This residue forms from food spills that are not cleaned immediately. Here’s how to tackle it:
Start by gathering the necessary tools:
| Tool | Purpose |
| Plastic Scraper | Remove large chunks of residue |
| Baking Soda Paste | Soften and lift tough stains |
| Non-abrasive Sponge | Wipe away residue without scratching |
Steps to clean baked-on residue:
- Cool Down: Ensure the oven is completely cool before starting.
- Scrape: Use a plastic scraper to gently remove loose residue.
- Apply Baking Soda Paste: Mix baking soda with water to form a paste. Apply it generously on the residue.
- Wait: Let the paste sit for at least 15 minutes to break down the residue.
- Wipe Clean: Use a non-abrasive sponge to wipe away the paste and loosened residue.
Repeat the process if necessary. Regular maintenance helps prevent buildup, making cleaning easier over time.

Eco-friendly Alternatives
Cleaning your oven can be a daunting task, especially if you're committed to eco-friendly methods. Traditional cleaning products often contain harsh chemicals that can harm both the environment and your health. Fortunately, there are natural alternatives that are both effective and safe. These methods use everyday household items to make oven cleaning easy and green. Let's explore two popular eco-friendly options: lemon juice and olive oil.
Using Lemon Juice
Lemon juice is a powerful natural cleaner due to its acidic properties. It cuts through grease and grime, leaving surfaces sparkling clean. This method is simple and requires minimal effort.
- Prepare the mixture: Mix half a cup of lemon juice with a cup of water.
- Heat the oven: Preheat your oven to 250°F (120°C).
- Place the mixture: Pour the lemon juice solution into an oven-safe bowl.
- Clean the oven: Place the bowl inside the oven and let it heat for 30 minutes.
- Wipe away grime: Turn off the oven, let it cool slightly, then wipe the surfaces with a damp cloth.
This method not only cleans but also leaves a fresh citrus scent. It’s a perfect solution for those sensitive to chemical odors. Lemon juice is biodegradable, ensuring that your cleaning process is environmentally friendly.
Olive Oil Solutions
Olive oil isn't just for cooking; it's a great natural cleaner for ovens. It helps to loosen stubborn stains and sticky spots.
Here's how to use olive oil for cleaning:
- Gather supplies: You need olive oil, baking soda, and a soft cloth.
- Make a paste: Combine olive oil with baking soda to form a thick paste.
- Apply the paste: Spread the paste over areas with tough stains and grease.
- Let it sit: Allow the mixture to sit for 20 minutes.
- Wipe clean: Use a damp cloth to wipe away the paste, revealing a clean surface.
This method is gentle on your oven and effective at removing grime. Olive oil is non-toxic and biodegradable, making it a safe choice for eco-conscious households. Plus, it leaves a subtle, pleasant aroma, turning a chore into a refreshing experience.
When To Seek Help
Cleaning your oven can be a daunting task. While many people prefer doing it themselves, there are times when seeking professional help is the best option. Knowing when to reach out for assistance can save you time and ensure your oven functions optimally. Let's explore the scenarios where you might need expert support.
Professional Cleaning Services
If your oven has accumulated stubborn grime and grease over time, professional cleaning services might be a wise choice. These experts bring specialized tools and cleaning agents to handle even the toughest dirt. Consider professional help if:
- Persistent stains: Some stains don't budge with regular scrubbing and require industrial-strength solutions.
- Time constraints: Your busy schedule makes thorough cleaning challenging.
- Health concerns: Strong odors or smoke during self-cleaning cycles might affect health.
Professional cleaners typically offer:
| Service Type | Features |
| Deep Cleaning | Removes built-up grease and grime. |
| Eco-friendly Solutions | Uses non-toxic and safe cleaning products. |
| Quick Turnaround | Ensures minimal downtime for your appliance. |
Choosing a professional service ensures your oven is sparkling clean, without the hassle and health risks of DIY cleaning.
Repair Needs
Sometimes cleaning alone isn't enough. If your oven shows signs of malfunction, repair services might be necessary. Common issues include:
- Uneven heating: Food cooks unevenly, suggesting a problem with the heating elements.
- Strange noises: Unusual sounds during operation might indicate mechanical issues.
- Faulty door seals: Heat escapes, leading to inefficient cooking.
Consider repair services when:
- DIY fixes fail: Attempts to repair on your own don't resolve the issue.
- Safety concerns arise: Electrical faults or gas leaks pose safety risks.
- Warranty coverage: Your oven is under warranty, offering cost-effective repairs.
Professional repair services can diagnose and fix issues efficiently, ensuring your oven returns to optimal working condition. This not only extends its lifespan but also enhances cooking performance.
Frequently Asked Questions
What Is The Best Way To Clean The Inside Of An Oven?
Use a baking soda and water paste to clean the oven. Apply it inside and let it sit overnight. Wipe with a damp cloth. For stubborn spots, use vinegar. Avoid harsh chemicals for a safer clean. Regular cleaning prevents buildup and maintains efficiency.
What Is The Best Way To Clean A Really Dirty Oven?
Use a baking soda and water paste to coat the oven's interior. Let it sit overnight. Scrub off with a damp cloth. For stubborn spots, apply vinegar and rinse. Use gloves for protection.
Do Baking Soda And Vinegar Really Clean Ovens?
Yes, baking soda and vinegar effectively clean ovens. They break down grime and grease naturally. Mix baking soda with water to form a paste. Apply it to the oven's interior. Let it sit overnight, then wipe. Spray vinegar to remove residue and neutralize odors.
This method is eco-friendly and non-toxic.
Conclusion
Cleaning your oven doesn't have to be hard. With simple steps, you can tackle the grime. Regular maintenance keeps your oven in top shape. Use baking soda and vinegar for natural cleaning. Safety matters, so unplug before cleaning. Test a small area with cleaners.
Follow these tips, and your oven will shine. Enjoy your cooking without the smell of burnt food. A clean oven makes cooking more pleasant. Remember to clean every few months. Happy cooking and baking!

Catalin Fatul is the founder and expert behind Premier Contract Cleaning, dedicated to providing top-notch cleaning solutions and tips. With a passion for cleanliness and a commitment to quality, Catalin brings years of experience in the cleaning industry to help readers maintain pristine spaces. Whether it's offering the latest cleaning hacks or recommending the best products, Catalin's mission is to make cleaning efficient, effective, and enjoyable.
A shop can look spotless at nine in the morning and tired by three in the afternoon. We see it constantly across Dublin retail floors. The fix is rarely more scrubbing. It is a layered routine that holds presentation through the whole trading day. Quick answer: A retail store cleaning checklist should cover entrances, the […]
The Dublin businesses that never seem to have a cleaning crisis all have one thing in common. They work to a calendar, not to the weather. We have cleaned for enough years here to spot the pattern: the reactive ones lurch from blocked gutters to slippery entrances, while the planned ones simply have the right […]
Every cleaning company calls itself green now. We hear it constantly, and so does every facility manager we meet in Dublin. The hard part is no longer finding a cleaner who says they are sustainable. It is telling the genuine ones from the marketing slogans. Quick answer: The main sustainable cleaning credentials in Ireland are […]